Righty then. I've recovered from my rather exciting weekend with my friends that involved a lot of Band Hero, some extremely weird scenarios and yorkshire puddings with custard (don't try it...just, don't). It was truly a weekend I shall never forgot for a number of reasons.
On a separate note though, my grandparents are visiting for a few weeks! For me, this is a very good opportunity to have a party because they live all the way on the other side of the Atlantic in Florida, so they don't visit very often. In fact, I think the last time they visited was 6 years ago. It's been nice to talk to both of them now I'm more mentally aware and mature because I can finally fully appreciate them for what good people they are ^_^
So for the next almost-month I'll be able to see my grandparents, which is nice, and there's also a good event around the corner that I may be making a small, culinary contribution to: My youngest nephew's christening! It's been planned for a while now and if my sister gives me a list of things she wants me to make then along with other members of my family I'll be working to get the food-side of things under control so that it's one less thing for my sister to worry about. I do hope it goes alright, I'll be sure to take pictures and post on here ^_^

Monday, 31 May 2010

Thursday, 27 May 2010
Banoffee Pie (Serves up to 12)
Never before had I tried to make this until my Mum forced me to (I say 'forced' in the nicest possible way) but I've got to say that this pie (which isn't really a pie) is very simple to make and it tastes really nice. The reason I'm blogging today as opposed to procrastinating and posting later in the week is because I probably won't have time to post at any other date.
Tomorrow I have an exam ([sarcasm] yay me [/sarcasm]) and later on in the day I'm going to my friend's for a two night sleepover. It'll be me and three other friends just having a good laugh about doing god-knows-what until god-knows-when in the morning. So far we've got Buzz, Rock Band, a dance-off and dvds planned as well as the possibility of eating mentos and diet coke and seeing what happens (stomach pump on standby). It should be a fun night I reckon, but for now it's on with the recipe!
Difficulty: **
Pros: Not technical at all
Cons: Crushing biscuits can be messy!
Ingredients
125g Margerine
300g Digestives (cru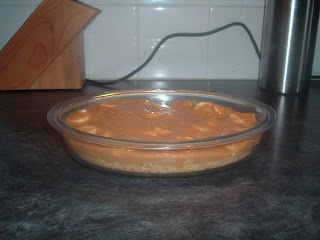 shed)
shed)
2 large bananas
1 tin of Caramel
1 tub of whipping/double cream
Optional: Grated chocolate
Method
1) Crush the digestive biscuits. There are a few ways to do this, but the way I prefer to do it is to use a rolling pin to pound and crush the digestives (a few at a time) in a large bowl.
Another way you may like to do it is to put the digestives in a towel, fold the towel over and then crush them with a rolling pin. This method does leave you with a crumby towel though.
2) Melt the butter in a pan and then pour it over the digestives, stirring until thoroughly incorporated.
3) Into a large dish (or a number of small dishes if you prefer) pour the mixture. Pat it down with a spoon or a fork and leave to set for an hour in the fridge.
NOTE: If you're lucky enough to have a food processor you can bypass steps 1 and 2 by just blending the ingredients together. The high speed of the processor allows the butter to incorporate despite not being melted.
4) In a bowl pour the caramel and soften it out before adding in 2 chopped bananas and stirring well.
NOTE: It's important to make sure the banana is covered by the caramel otherwise it w ill oxidse, turn brown and taste bad.
5) Whip the cream however you prefer before spreading it over the top of the caramel.
Optionals: 1) Refrigerate the whole thing before serving. 2) Sprinkle on some grated chocolate as I've done.
In other news I was very pleased today because I found the perfect angle and environment in my house to take decent looking pictures of food. So it seems for now the background/setting of my photos won't be changing, but I hope you'll forgive me because now you can properly see what's in the pictures! Ta-ta for now readers, hope you enjoy :P

Tomorrow I have an exam ([sarcasm] yay me [/sarcasm]) and later on in the day I'm going to my friend's for a two night sleepover. It'll be me and three other friends just having a good laugh about doing god-knows-what until god-knows-when in the morning. So far we've got Buzz, Rock Band, a dance-off and dvds planned as well as the possibility of eating mentos and diet coke and seeing what happens (stomach pump on standby). It should be a fun night I reckon, but for now it's on with the recipe!
Difficulty: **
Pros: Not technical at all
Cons: Crushing biscuits can be messy!
Ingredients
125g Margerine
300g Digestives (cru
 shed)
shed)2 large bananas
1 tin of Caramel
1 tub of whipping/double cream
Optional: Grated chocolate
Method
1) Crush the digestive biscuits. There are a few ways to do this, but the way I prefer to do it is to use a rolling pin to pound and crush the digestives (a few at a time) in a large bowl.
Another way you may like to do it is to put the digestives in a towel, fold the towel over and then crush them with a rolling pin. This method does leave you with a crumby towel though.
2) Melt the butter in a pan and then pour it over the digestives, stirring until thoroughly incorporated.
3) Into a large dish (or a number of small dishes if you prefer) pour the mixture. Pat it down with a spoon or a fork and leave to set for an hour in the fridge.
NOTE: If you're lucky enough to have a food processor you can bypass steps 1 and 2 by just blending the ingredients together. The high speed of the processor allows the butter to incorporate despite not being melted.
4) In a bowl pour the caramel and soften it out before adding in 2 chopped bananas and stirring well.
NOTE: It's important to make sure the banana is covered by the caramel otherwise it w
 ill oxidse, turn brown and taste bad.
5) Whip the cream however you prefer before spreading it over the top of the caramel.
Optionals: 1) Refrigerate the whole thing before serving. 2) Sprinkle on some grated chocolate as I've done.
In other news I was very pleased today because I found the perfect angle and environment in my house to take decent looking pictures of food. So it seems for now the background/setting of my photos won't be changing, but I hope you'll forgive me because now you can properly see what's in the pictures! Ta-ta for now readers, hope you enjoy :P
Wednesday, 26 May 2010
Grilled Cheese Sandwich (Serves 1...or 2)
After watching a 3 year old youtube video by Spricket24 (A vlogger whom I highly recommend you watch) I got the inspiration to make something truly American/Simmish (Play the Sims 2 Nightlife, you'll understand): A Grilled Cheese Sandwich. It turns out that a grilled cheese sandwich is pretty much just a toastie without the toastie maker, but it feels different when you make it.

Difficulty: **
Pros: Quick, simple and easy.
Cons: I guess it could be easy to burn?
Ingredients
2 Slices of Bread
Margerine
Cheese
Method
1) Butter one side of each slice of bread.
2) Grate/cut an amount of cheese that you'd like
3) Spread it over the unbuttered side of one piece of bread
4) Place the piece of bread, butterside down, into a frying pan on a medium heat. At this point place the second piece of bread, butterside up, on top of this.
5) As the cheese melts it will act as a food glue that will keep the piece on top in place. The butter on the pieces of bread will stop them cooking onto the pan and will also help the bread get a golden colour to it.
6) When the bread is golden on the buttered side, flip the whole sandwich over to brown on the other side.
7) Once both sides are golden, serve as you wish!

It's very unusual for me to blog twice in one day, I think this is a first, but it really was a spur-of-the-moment blog that I hope you all enjoy trying out because the ending result is really nice. It's better than a toastie because the cheese isn't trapped in the bread so when you bite into it your mouth isn't burnt by molten cheese or hot air escaping. Keep reading for a banoffee pie that I *promise* is coming soon!

Difficulty: **
Pros: Quick, simple and easy.
Cons: I guess it could be easy to burn?
Ingredients
2 Slices of Bread
Margerine
Cheese
Method

1) Butter one side of each slice of bread.
2) Grate/cut an amount of cheese that you'd like
3) Spread it over the unbuttered side of one piece of bread
4) Place the piece of bread, butterside down, into a frying pan on a medium heat. At this point place the second piece of bread, butterside up, on top of this.
5) As the cheese melts it will act as a food glue that will keep the piece on top in place. The butter on the pieces of bread will stop them cooking onto the pan and will also help the bread get a golden colour to it.
6) When the bread is golden on the buttered side, flip the whole sandwich over to brown on the other side.
7) Once both sides are golden, serve as you wish!

It's very unusual for me to blog twice in one day, I think this is a first, but it really was a spur-of-the-moment blog that I hope you all enjoy trying out because the ending result is really nice. It's better than a toastie because the cheese isn't trapped in the bread so when you bite into it your mouth isn't burnt by molten cheese or hot air escaping. Keep reading for a banoffee pie that I *promise* is coming soon!
Political GaGa Buns (serves 12)
The name is a bit confusing, I know, but bear with me and I'll explain it. In the last week of school me and my friends decided to have a mini-party at lunchtime and I decided to make some buns to say thank you to the teachers that had helped me over the past 5 years. So to do this I decided to make buns, cover the tops in buttercream (coloured red, blue, yellow and green) and, once that had dried, I piped on letters in white glacé icing so that the buns formed a word together.
The name that I gave these buns comes from two things:
1) The yellow buttercream turned out so yellow that it reminded me of Lady GaGa's hair (see the picture for comparison)
2) A friend of mine commented that I should offer a teacher interested in politics a choice between a red and blue bun (the colours of the Labour and Conservative parties) and see if she chooses the red bun. He then added that if she chose the red bun he would take the blue bun and proceed to eat it, proclaiming that 'this blue bun has really changed my life'. Of course, when it came to offering her a bun, I made sure that there were only green ones.
When it came to writing a title for this blog entry I thought it'd lack any creativity to just put 'Buttercream Buns' so I decided to be a bit original. Moving swiftly on from this slowly growing paragraph, here's how to make them!
Difficulty: ***
Pros:
The ending product is really quite nice.
Cons:
Colouring the buttercream can be a bit awkward
Ingredients
For the buttercream
75g Margerine
175g Icing sugar
Food colouring (you can choose whichever colours you like)
For the Glacé Icing
Icing Sugar
Water
Method
For the buttercream
1) Soften the margerine in a bowl before sieving the icing sugar in and stirring until soft. You may need to add a small amount of water.
NOTE: Sieving is very important otherwise the buttercream will contain icing sugar lumps
2) Divide the buttercream equally into as many bowls as colours you want (i.e. if you're making 3 colours, divide it into 3 bowls)
3) Add the food colouring a capful at a time to the buttercream until you get the colour you would like.
NOTE: Different colours will require different amounts, don't assume that because one colour requires a lot of colouring that every colour does. Otherwise you'll end up with GaGa buns like me!
4) You may need to add more sieved icing sugar to the ending buttercream to thicken the consistency.
5) Place about a tablespoon of buttercream onto each bun and smooth it out before leaving it to set in a cool place.
For the Glacé Icing
1) Sieve any amount of icing sugar into a bowl and make a small 'well' in the centre.
2) Add small amounts of water (about a teaspoon) at a time and mix well.
3) The consistency for piping, generally, should be thick enough so that if you run your finger along the back of the spoon the line of icing left behind should hold for at least a few seconds.
4) Pipe the glacé icing into whatever letters or images you like!
That's pretty much it. They're not tremendously difficult to make, though I should warn you that the food colouring does affect the taste slightly (though not in a negative way) depending on how much you add. The next thing I'll be making is a Banoffee Pie, purely because my Mum's asked me to make one. So I hope you all keep reading!
The name that I gave these buns comes from two
 things:
1) The yellow buttercream turned out so yellow that it reminded me of Lady GaGa's hair (see the picture for comparison)
2) A friend of mine commented that I should offer a teacher interested in politics a choice between a red and blue bun (the colours of the Labour and Conservative parties) and see if she chooses the red bun. He then added that if she chose the red bun he would take the blue bun and proceed to eat it, proclaiming that 'this blue bun has really changed my life'. Of course, when it came to offering her a bun, I made sure that there were only green ones.
When it came to writing a title for this blog entry I thought it'd lack any creativity to just put 'Buttercream Buns' so I decided to be a bit original. Moving swiftly on from this slowly growing paragraph, here's how to make them!
Difficulty: ***
Pros:
The ending product is really quite nice.
Cons:

Colouring the buttercream can be a bit awkward
Ingredients
For the buttercream
75g Margerine
175g Icing sugar
Food colouring (you can choose whichever colours you like)
For the Glacé Icing
Icing Sugar
Water
Method
For the buttercream
1) Soften the margerine in a bowl before sieving the icing sugar in and stirring until soft. You may need to add a small amount of water.
NOTE: Sieving is very important otherwise the buttercream will contain icing sugar lumps
2) Divide the buttercream equally into as many bowls as colours you want (i.e. if you're making 3 colours, divide it into 3 bowls)
3) Add the food colouring a capful at a time to the buttercream until you get the colour you would like.
NOTE: Different colours will require different amounts, don't assume that because one colour requires a lot of colouring that every colour does. Otherwise you'll end up with GaGa buns like me!
4) You may need to add more sieved icing sugar to the ending buttercream to thicken the consistency.
5) Place about a tablespoon of buttercream onto each bun and smooth it out before leaving it to set in a cool place.
For the Glacé Icing
1) Sieve any amount of icing sugar into a bowl and make a small 'well' in the centre.
2) Add small amounts of water (about a teaspoon) at a time and mix well.
3) The consistency for piping, generally, should be thick enough so that if you run your finger along the back of the spoon the line of icing left behind should hold for at least a few seconds.

4) Pipe the glacé icing into whatever letters or images you like!
That's pretty much it. They're not tremendously difficult to make, though I should warn you that the food colouring does affect the taste slightly (though not in a negative way) depending on how much you add. The next thing I'll be making is a Banoffee Pie, purely because my Mum's asked me to make one. So I hope you all keep reading!
Friday, 21 May 2010
Goodbye school, hello exams! Wait, that's not a good thing...
Yes, earlier this week I officially finished high school and went on study leave for my final exams. At our school we celebrate the last day for year 11 with shirt signing, an hour long assembly celebrating the year's achievements, a few more hours of shirt signing (with some tears from some people) before a quick trip to a buffet and bein
 g escorted off the premises (with more tears from some people).
The day went by very fast, I felt, and it was very hectic with everyone rushing round to get *everyone* to sign their shirts, but for me I felt it was the emotional climax I was looking for. People were happy, sad, joyous and regretful, but everyone felt something and everyone said their goodbyes and their thank yous to their teachers and close friends. In the end, although not all of us may have wanted to leave, I think that we were ready to leave at that point.
Of course it was never really leaving for long as some people had revision sessions the next day and I had an exam this morning (Biology, for the curious among you) but never again will people be together as a form
  going about their proper lessons for a day and I'm unsure if that truth has emotionally hit me yet, despite being mentally aware of it. Maybe I expect myself to cry or something? Maybe I will? Maybe I've underestimated myself and it's already hit me without the tears? I honestly don't know.What I do know is that I'll never forget my last day. There were many bubbles blown, shirts signed and it was fun walking round with a GaGa-bolt askew on my face and a Telephone on my hands (I'm that sad, yes), now it's the home stretch before the next race: College.
In other, blog related news, I'll be blogging about the recipe for the leaving buns I made earlier in the week this weekend and after that I may be blogging about Banoffee Pie (I'm only speculating at this point, I saw the digestive biscuits, bananas and double cream in the kitchen earlier). Hope you had a good week!
Photo source: Rachel Cross, all rights reserved. The unauthorised reproduction and illegal distribution of these photos for money is strictly prohibited and may result in a minor fine and gelding, applicable to all men, Lady GaGa and Mrs Boffey.
 At our school we celebrate the last day for year 11 with shirt signing, an hour long assembly celebrating the year's achievements, a few more hours of shirt signing (with some tears from some people) before a quick trip to a buffet and bein
 g escorted off the premises (with more tears from some people).
The day went by very fast, I felt, and it was very hectic with everyone rushing round to get *everyone* to sign their shirts, but for me I felt it was the emotional climax I was looking for. People were happy, sad, joyous and regretful, but everyone felt something and everyone said their goodbyes and their thank yous to their teachers and close friends. In the end, although not all of us may have wanted to leave, I think that we were ready to leave at that point.
Of course it was never really leaving for long as some people
 had revision sessions the next day and I had an exam this morning (Biology, for the curious among you) but never again will people be together as a form
  going about their proper lessons for a day and I'm unsure if that truth has emotionally hit me yet, despite being mentally aware of it. Maybe I expect myself to cry or something? Maybe I will? Maybe I've underestimated myself and it's already hit me without the tears? I honestly don't know.What I do know is that I'll never forget my last day. There were many bubbles blown, shirts signed and it was fun walking round with a GaGa-bolt askew on my face and a Telephone on my hands (I'm that sad, yes), now it's the home stretch before the next race: College.
In other, blog related news, I'll be blogging about the recipe for the leaving buns I made earlier in the week this weekend and after that I may be blogging about Banoffee Pie (I'm only speculating at this point, I saw the digestive biscuits, bananas and double cream in the kitchen earlier). Hope you had a good week!
Photo source: Rachel Cross, all rights reserved. The unauthorised reproduction and illegal distribution of these photos for money is strictly prohibited and may result in a minor fine and gelding, applicable to all men, Lady GaGa and Mrs Boffey.
Monday, 17 May 2010
Butterfly Buns (serves 12)
Unfortunately I didn't manage to make my '2 blogs a week' last week (which is disheartening for me, at least) but I promise to give you 3 blogs this week, you lucky people. This blog's all about the butterfly buns that I made for my friend Eliza's charity function at a local community centre. It all went extremel y well on the day and through the baking stall, selling tea and coffee as well as various other things like a raffle she managed to raise over £400 with more still to come! Personally I found this fantastic. From a relatively small coffee morning I had not expected to get that much at all.
So once the donations have stopped coming the money will be split in half with half of it going to the Sophie Lancaster Foundation (Sophie, pictured on the left) and the other half going to the Price Of Wales Hospice, two very good places. 'Tis all I have to say about that really, so I'll let you get on with reading about the recipe!
Difficulty: **
Pros
Easy to make
Classic and tasty
Cons
Buttercream can have a varying consistency
Ingredients (fills roughly 12 butterfly buns)
75g Margerine
175g Icing Sugar
1 tsp Vanilla Essence
Method
1) Soften the butter in the bowl.
NOTE: this makes it easier to stir the icing sugar in.
2) Add the vanilla essence.
3) Sieve the icing sugar into the bowl in small amounts, stirring between each sieving until a smooth consistency is reached.
4) Using a sharp knife, cut the tops off of your buns however you prefer. Then cut the pieces in half, these will be the butterfly's wings.

5) Using a spoon or a piping bag, put about a heaped teaspoon of buttercream onto the bun.
6) Place the cut off pieces into the buttercream in a way that they stand up like wings (refer to the pictures if you are unsure how to do this)
Another suggestion: Instead of buttercream you could just use whipped cream. Simply take a carton of double or whipping cream, whip it until it forms stiff peaks and pipe/spoon on as you require!

That's pretty much all you need to know for making butterfly buns, they're quite simple but very nice to have once in a while. If the amount of buttercream is too little or too much for you then you can alter it however you please!
My final sidenote for people that want to make the chocolate buns pictured, all you have to do is replace 50g of Self Raising flour with 50g of Cocoa Powder when making normal buns.
So you'd put 100g of Self Raising flour into the bowl with 50g of Cocoa Powder.
I hope you enjoyed this post guys, I'll be putting up another one about buns I've made for teachers and leaving day next!
 y well on the day and through the baking stall, selling tea and coffee as well as various other things like a raffle she managed to raise over £400 with more still to come! Personally I found this fantastic. From a relatively small coffee morning I had not expected to get that much at all.
So once the donations have stopped coming the money will be split in half with half of it going to the Sophie Lancaster Foundation (Sophie, pictured on the left) and the other half going to the Price Of Wales Hospice, two very good places. 'Tis all I have to say about that really, so I'll let you get on with reading about the recipe!
Difficulty: **
Pros
Easy to make
Classic and tasty

Cons
Buttercream can have a varying consistency
Ingredients (fills roughly 12 butterfly buns)
75g Margerine
175g Icing Sugar
1 tsp Vanilla Essence
Method
1) Soften the butter in the bowl.
NOTE: this makes it easier to stir the icing sugar in.
2) Add the vanilla essence.
3) Sieve the icing sugar into the bowl in small amounts, stirring between each sieving until a smooth consistency is reached.
4) Using a sharp knife, cut the tops off of your buns however you prefer. Then cut the pieces in half, these will be the butterfly's wings.

5) Using a spoon or a piping bag, put about a heaped teaspoon of buttercream onto the bun.
6) Place the cut off pieces into the buttercream in a way that they stand up like wings (refer to the pictures if you are unsure how to do this)
Another suggestion: Instead of buttercream you could just use whipped cream. Simply take a carton of double or whipping cream, whip it until it forms stiff peaks and pipe/spoon on as you require!

That's pretty much all you need to know for making butterfly buns, they're quite simple but very nice to have once in a while. If the amount of buttercream is too little or too much for you then you can alter it however you please!
My final sidenote for people that want to make the chocolate buns pictured, all you have to do is replace 50g of Self Raising flour with 50g of Cocoa Powder when making normal buns.
So you'd put 100g of Self Raising flour into the bowl with 50g of Cocoa Powder.
I hope you enjoyed this post guys, I'll be putting up another one about buns I've made for teachers and leaving day next!
Thursday, 13 May 2010
Icing Syringe - tried and tested!
Okay, so I got the chance to use my new toy on some cream cakes last week (see previous recipe) and my charity buns (post to come) and I can say that I rather like it!
It's not without its flaws, like putting the mixture *into* it (air bubbles can be easily made and it's generally messy) but because of its shape and how you need to press it your hand doesn't cramp like with an ordinary piping bag and you can get some rather good designs done with it.
The test of strength with my first piping bag was whipped cream. It failed, I should say, by bursting at the seams and is the reason why I judge whipped cream as a piping strength test. The syringe passed with flying colours (and no flying cream) and I think it was a very good buy for the cheap price it was. If you ever get the chance to get one, you should :P
In other blog-news I should be blogging about butterfly buns soon with more bun decoration to come *next* week as a gift for my teachers on my leaving day. It's gonna be a weird day, leaving, but it's something everyone goes through I guess. Hope you all read my next recipe, the buns look gorgeous!
It's not without its flaws, like putting the mixture *into* it (air bubbles can be easily made and it's generally messy) but because of its shape and how you need to press it your hand doesn't cramp like with an ordinary piping bag and you can get some rather good designs done with it.
The test of strength with my first piping bag was whipped cream. It failed, I should say, by bursting at the seams and is the reason why I judge whipped cream as a piping strength test. The syringe passed with flying colours (and no flying cream) and I think it was a very good buy for the cheap price it was. If you ever get the chance to get one, you should :P
In other blog-news I should be blogging about butterfly buns soon with more bun decoration to come *next* week as a gift for my teachers on my leaving day. It's gonna be a weird day, leaving, but it's something everyone goes through I guess. Hope you all read my next recipe, the buns look gorgeous!
Subscribe to:
Posts (Atom)