Thursday, 17 June 2010

Chocolate Truffles

Unfortunately I was unable to take pictures of my own truffles so I apologise. There was a big rush on the day of the christening to get all the food up to the venue and my poor truffles had to be stashed in a plastic box because there wasn't room on the table, so they wouldn't have even been set out nicely for a picture anyway! I can assure you, however, that they were very well received by the guests and were polished off faster than anything else there (though, to be fair, they were also smaller than anything else there). These truffles are rich and indulgent yet very simple to make, you've just got to be sure to set aside enough time for refrigeration and freezing otherwise they'll never form as you want them to!

Difficulty: ***

Pros: Rich and indulgent yet simple to make.

Cons: Takes time to refrigerate, freeze and set.

Ingredients:

150ml double cream

1 egg yolk

25g caster sugar

150g plain chocolate, broken into pieces

25g unsalted butter, softened

Optional: 1 tablespoon of liquid Coffee (as opposed to coffee granules)

For Decorating:

1 bar of grated chocolate (I use milk chocolate, though you can use whichever you like)

Method

1) Bring the cream to the boil before immediately reducing the heat to a low temperature.

2) Whisk the egg yolk and the sugar together before adding to the cream.

3) Break up the chocolate into its individual pieces before adding to the cream and stirring until it has all melted.
NOTE: It will take constant stirring for a short while before the chocolate fully melts and combines with the cream to form a velvety ganache sauce.

4) Add the tablespoon of coffee to the chocolate, it brings out the flavour more.

5) Refrigerate for an hour or until it has all set.

6) Whisk in the butter, I find it easiest to do with an electric whisk, before returning to the fridge until set once more.

7) Take teaspoons of the mixture, form them into ball shapes in your hand and then roll them in the grated chocolate until covered. This step is very messy!

8) Once the truffles have been formed and coated set them to freeze for a whole hour. This helps them to further firm up and they can be eaten straight from frozen, so you can keep them in the freezer right up until serving.

I hope this recipe works for you all and produces truffles that gain many compliments from people, for me it makes cooking completely worth it when people compliment you. It's not because they compliment me that makes it worthwhile, it's the fact that to want to compliment me they truly must have enjoyed what they've had to eat.
One extra point for this recipe in regards to decorating the truffles, this is another recipe that you can truly make your own in terms of presentation. If you want to coat the soft truffles with melted chocolate to give them a hard chocolate coating when it comes to eating or if you want to perhaps drizzle melted white chocolate on them etc. there are thousands of ways you can personalise and make these truffles unique. So don't be afraid to do so!
I have no idea what my next recipe will be about but, from the looks of things, it's most likely going to be another sweet treat. I apologise to any dieters that read my blog and I do hope you forgive me :P

Wednesday, 9 June 2010

Christening foodz!

Okay, quick update for this week, it's my wonderful nephew's christening this Sunday so I'm going to be making some Butterfly Buns and some Chocolate Truffles. The latter I plan to be posting a recipe for on here, but if I get the extra time and motivation to make something else quite simple such as Jam Tarts or Maids Of Honour then I just might. It all depends on what's available ingredients-wise as well as the time I've got left, but I thought I would update my blog to let people know =P
I'll blog again soon, in the meantime I'll be slogging out exams at school. Sounds fun, doesn't it? Don't let jealousy take over too much though, 'cause I'm more than halfway through them all now (thank god).

Thursday, 3 June 2010

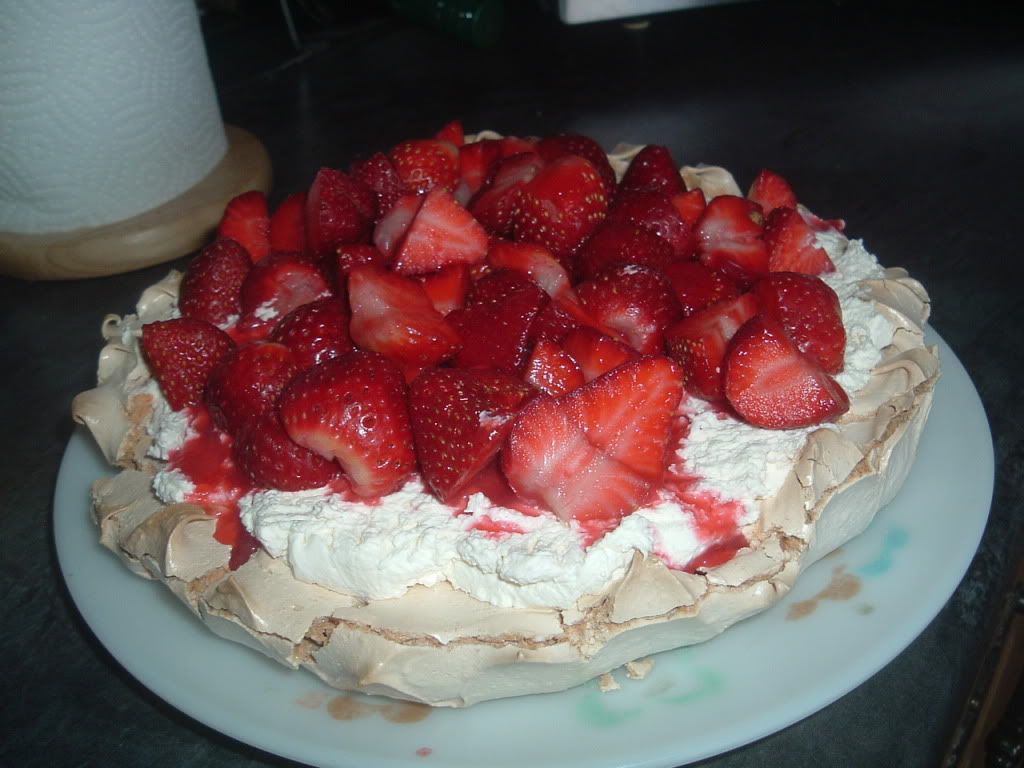
Strawberry Pavlova

I've got a quick, easy recipe for a Strawberry Pavlova that's impossible to mess up (well, not literally, but you get what I mean) and will make you look like a very accomplished baker. If you don't like strawberries than you can use any fruit you like or, if you're feeling particularly indulgent, something like profiteroles!

Ingredients
3 Egg whites (you could use the yolks for scrambled eggs in another recipe if you dislike throwing food out)
175g Sugar
150ml Double or Whipping cream
400g Strawberries

Oven Temp: 160 degrees celsius

NOTE: For ease, an electric whisk is ideal for this recipe!

Method

NOTE:
When making meringue the method is very important, if you get it wrong your meringue may come out with big sugar crystals or be one mushy mess all over your oven tray.

1) Whisk the egg whites until frothy, then (while still whisking) add the sugar slowly. You'll see the mixture become pure white.

2) Continue whisking until the mixture forms stiff, white peaks (i.e. peaks that stay up by themselves) when you take the whisk out (turn it off first!)

3) On a piece of greasproof paper, draw around a cake tin with a pen or pencil and then turn the paper over. You'll use this outline for the boundary of the meringue and you flip the paper over so that the meringue doesn't absorb any of the colour from the pen or pencil.

4) Using a butter knife, palette knife, spoon, spatula, whatever you please, form or mould the merginue however you please. If you've whisked it right, it should be very agreeable to moulding to the point where you can make a bowl.

5) Bake for around 40 minutes, but when the time is up don't take the meringue out of the oven. Turn the oven off and open the door just a crack. The meringue is very delicate and a sudden temperature change can cause cracks.

6) Once the meringue is cool, whisk your cream in a bowl until it is thick and whipped.

7) Cut your strawberries up in chunks or slices, however you prefer.

8) Spoon the cream onto the meringue and place the strawberries on top. Your pavlova is ready to serve.

This recipe is very satisfying to eat and is extremely customisable to your likes. Any fruit you like can be used, you can layer the cream/fruit however you wish and the meringue can be moulded however you like as well.
When I made this recipe a second time I shaped my meringue into a bowl with high sides and had 3 layers of strawberries and cream through it.
So don't feel you have to rigidly stick to the presentation I've descriped above!

Monday, 31 May 2010

Grandparents & A Fun Weekend

Righty then. I've recovered from my rather exciting weekend with my friends that involved a lot of Band Hero, some extremely weird scenarios and yorkshire puddings with custard (don't try it...just, don't). It was truly a weekend I shall never forgot for a number of reasons.
On a separate note though, my grandparents are visiting for a few weeks! For me, this is a very good opportunity to have a party because they live all the way on the other side of the Atlantic in Florida, so they don't visit very often. In fact, I think the last time they visited was 6 years ago. It's been nice to talk to both of them now I'm more mentally aware and mature because I can finally fully appreciate them for what good people they are ^_^
So for the next almost-month I'll be able to see my grandparents, which is nice, and there's also a good event around the corner that I may be making a small, culinary contribution to: My youngest nephew's christening! It's been planned for a while now and if my sister gives me a list of things she wants me to make then along with other members of my family I'll be working to get the food-side of things under control so that it's one less thing for my sister to worry about. I do hope it goes alright, I'll be sure to take pictures and post on here ^_^

Thursday, 27 May 2010

Banoffee Pie (Serves up to 12)

Never before had I tried to make this until my Mum forced me to (I say 'forced' in the nicest possible way) but I've got to say that this pie (which isn't really a pie) is very simple to make and it tastes really nice. The reason I'm blogging today as opposed to procrastinating and posting later in the week is because I probably won't have time to post at any other date.
Tomorrow I have an exam ([sarcasm] yay me [/sarcasm]) and later on in the day I'm going to my friend's for a two night sleepover. It'll be me and three other friends just having a good laugh about doing god-knows-what until god-knows-when in the morning. So far we've got Buzz, Rock Band, a dance-off and dvds planned as well as the possibility of eating mentos and diet coke and seeing what happens (stomach pump on standby). It should be a fun night I reckon, but for now it's on with the recipe!

Difficulty: **

Pros: Not technical at all

Cons: Crushing biscuits can be messy!

Ingredients
125g Margerine
300g Digestives (crushed)
2 large bananas
1 tin of Caramel
1 tub of whipping/double cream
Optional: Grated chocolate
Method
1) Crush the digestive biscuits. There are a few ways to do this, but the way I prefer to do it is to use a rolling pin to pound and crush the digestives (a few at a time) in a large bowl.
Another way you may like to do it is to put the digestives in a towel, fold the towel over and then crush them with a rolling pin. This method does leave you with a crumby towel though.
2) Melt the butter in a pan and then pour it over the digestives, stirring until thoroughly incorporated.
3) Into a large dish (or a number of small dishes if you prefer) pour the mixture. Pat it down with a spoon or a fork and leave to set for an hour in the fridge.

NOTE: If you're lucky enough to have a food processor you can bypass steps 1 and 2 by just blending the ingredients together. The high speed of the processor allows the butter to incorporate despite not being melted.

4) In a bowl pour the caramel and soften it out before adding in 2 chopped bananas and stirring well.
NOTE: It's important to make sure the banana is covered by the caramel otherwise it will oxidse, turn brown and taste bad.
5) Whip the cream however you prefer before spreading it over the top of the caramel.
Optionals: 1) Refrigerate the whole thing before serving. 2) Sprinkle on some grated chocolate as I've done.
In other news I was very pleased today because I found the perfect angle and environment in my house to take decent looking pictures of food. So it seems for now the background/setting of my photos won't be changing, but I hope you'll forgive me because now you can properly see what's in the pictures! Ta-ta for now readers, hope you enjoy :P

Wednesday, 26 May 2010

Grilled Cheese Sandwich (Serves 1...or 2)

After watching a 3 year old youtube video by Spricket24 (A vlogger whom I highly recommend you watch) I got the inspiration to make something truly American/Simmish (Play the Sims 2 Nightlife, you'll understand): A Grilled Cheese Sandwich. It turns out that a grilled cheese sandwich is pretty much just a toastie without the toastie maker, but it feels different when you make it.

Difficulty: **

Pros: Quick, simple and easy.

Cons: I guess it could be easy to burn?

Ingredients
2 Slices of Bread
Margerine
Cheese

Method
1) Butter one side of each slice of bread.
2) Grate/cut an amount of cheese that you'd like
3) Spread it over the unbuttered side of one piece of bread
4) Place the piece of bread, butterside down, into a frying pan on a medium heat. At this point place the second piece of bread, butterside up, on top of this.
5) As the cheese melts it will act as a food glue that will keep the piece on top in place. The butter on the pieces of bread will stop them cooking onto the pan and will also help the bread get a golden colour to it.
6) When the bread is golden on the buttered side, flip the whole sandwich over to brown on the other side.
7) Once both sides are golden, serve as you wish!

It's very unusual for me to blog twice in one day, I think this is a first, but it really was a spur-of-the-moment blog that I hope you all enjoy trying out because the ending result is really nice. It's better than a toastie because the cheese isn't trapped in the bread so when you bite into it your mouth isn't burnt by molten cheese or hot air escaping. Keep reading for a banoffee pie that I *promise* is coming soon!

Political GaGa Buns (serves 12)

The name is a bit confusing, I know, but bear with me and I'll explain it. In the last week of school me and my friends decided to have a mini-party at lunchtime and I decided to make some buns to say thank you to the teachers that had helped me over the past 5 years. So to do this I decided to make buns, cover the tops in buttercream (coloured red, blue, yellow and green) and, once that had dried, I piped on letters in white glacé icing so that the buns formed a word together.
The name that I gave these buns comes from two things:
1) The yellow buttercream turned out so yellow that it reminded me of Lady GaGa's hair (see the picture for comparison)
2) A friend of mine commented that I should offer a teacher interested in politics a choice between a red and blue bun (the colours of the Labour and Conservative parties) and see if she chooses the red bun. He then added that if she chose the red bun he would take the blue bun and proceed to eat it, proclaiming that 'this blue bun has really changed my life'. Of course, when it came to offering her a bun, I made sure that there were only green ones.
When it came to writing a title for this blog entry I thought it'd lack any creativity to just put 'Buttercream Buns' so I decided to be a bit original. Moving swiftly on from this slowly growing paragraph, here's how to make them!

Difficulty: ***

Pros:
The ending product is really quite nice.

Cons:
Colouring the buttercream can be a bit awkward

Ingredients
For the buttercream
75g Margerine
175g Icing sugar
Food colouring (you can choose whichever colours you like)

For the Glacé Icing
Icing Sugar
Water

Method
For the buttercream
1) Soften the margerine in a bowl before sieving the icing sugar in and stirring until soft. You may need to add a small amount of water.
NOTE: Sieving is very important otherwise the buttercream will contain icing sugar lumps
2) Divide the buttercream equally into as many bowls as colours you want (i.e. if you're making 3 colours, divide it into 3 bowls)
3) Add the food colouring a capful at a time to the buttercream until you get the colour you would like.
NOTE: Different colours will require different amounts, don't assume that because one colour requires a lot of colouring that every colour does. Otherwise you'll end up with GaGa buns like me!
4) You may need to add more sieved icing sugar to the ending buttercream to thicken the consistency.
5) Place about a tablespoon of buttercream onto each bun and smooth it out before leaving it to set in a cool place.

For the Glacé Icing
1) Sieve any amount of icing sugar into a bowl and make a small 'well' in the centre.
2) Add small amounts of water (about a teaspoon) at a time and mix well.
3) The consistency for piping, generally, should be thick enough so that if you run your finger along the back of the spoon the line of icing left behind should hold for at least a few seconds.
4) Pipe the glacé icing into whatever letters or images you like!

That's pretty much it. They're not tremendously difficult to make, though I should warn you that the food colouring does affect the taste slightly (though not in a negative way) depending on how much you add. The next thing I'll be making is a Banoffee Pie, purely because my Mum's asked me to make one. So I hope you all keep reading!