Thursday 17 June 2010

Chocolate Truffles

Unfortunately I was unable to take pictures of my own truffles so I apologise. There was a big rush on the day of the christening to get all the food up to the venue and my poor truffles had to be stashed in a plastic box because there wasn't room on the table, so they wouldn't have even been set out nicely for a picture anyway! I can assure you, however, that they were very well received by the guests and were polished off faster than anything else there (though, to be fair, they were also smaller than anything else there). These truffles are rich and indulgent yet very simple to make, you've just got to be sure to set aside enough time for refrigeration and freezing otherwise they'll never form as you want them to!

Difficulty: ***

Pros: Rich and indulgent yet simple to make.

Cons: Takes time to refrigerate, freeze and set.

Ingredients:

150ml double cream

1 egg yolk

25g caster sugar

150g plain chocolate, broken into pieces

25g unsalted butter, softened

Optional: 1 tablespoon of liquid Coffee (as opposed to coffee granules)

For Decorating:

1 bar of grated chocolate (I use milk chocolate, though you can use whichever you like)

Method

1) Bring the cream to the boil before immediately reducing the heat to a low temperature.

2) Whisk the egg yolk and the sugar together before adding to the cream.

3) Break up the chocolate into its individual pieces before adding to the cream and stirring until it has all melted.
NOTE: It will take constant stirring for a short while before the chocolate fully melts and combines with the cream to form a velvety ganache sauce.

4) Add the tablespoon of coffee to the chocolate, it brings out the flavour more.

5) Refrigerate for an hour or until it has all set.

6) Whisk in the butter, I find it easiest to do with an electric whisk, before returning to the fridge until set once more.

7) Take teaspoons of the mixture, form them into ball shapes in your hand and then roll them in the grated chocolate until covered. This step is very messy!

8) Once the truffles have been formed and coated set them to freeze for a whole hour. This helps them to further firm up and they can be eaten straight from frozen, so you can keep them in the freezer right up until serving.

I hope this recipe works for you all and produces truffles that gain many compliments from people, for me it makes cooking completely worth it when people compliment you. It's not because they compliment me that makes it worthwhile, it's the fact that to want to compliment me they truly must have enjoyed what they've had to eat.
One extra point for this recipe in regards to decorating the truffles, this is another recipe that you can truly make your own in terms of presentation. If you want to coat the soft truffles with melted chocolate to give them a hard chocolate coating when it comes to eating or if you want to perhaps drizzle melted white chocolate on them etc. there are thousands of ways you can personalise and make these truffles unique. So don't be afraid to do so!
I have no idea what my next recipe will be about but, from the looks of things, it's most likely going to be another sweet treat. I apologise to any dieters that read my blog and I do hope you forgive me :P

Wednesday 9 June 2010

Christening foodz!

Okay, quick update for this week, it's my wonderful nephew's christening this Sunday so I'm going to be making some Butterfly Buns and some Chocolate Truffles. The latter I plan to be posting a recipe for on here, but if I get the extra time and motivation to make something else quite simple such as Jam Tarts or Maids Of Honour then I just might. It all depends on what's available ingredients-wise as well as the time I've got left, but I thought I would update my blog to let people know =P
I'll blog again soon, in the meantime I'll be slogging out exams at school. Sounds fun, doesn't it? Don't let jealousy take over too much though, 'cause I'm more than halfway through them all now (thank god).

Thursday 3 June 2010

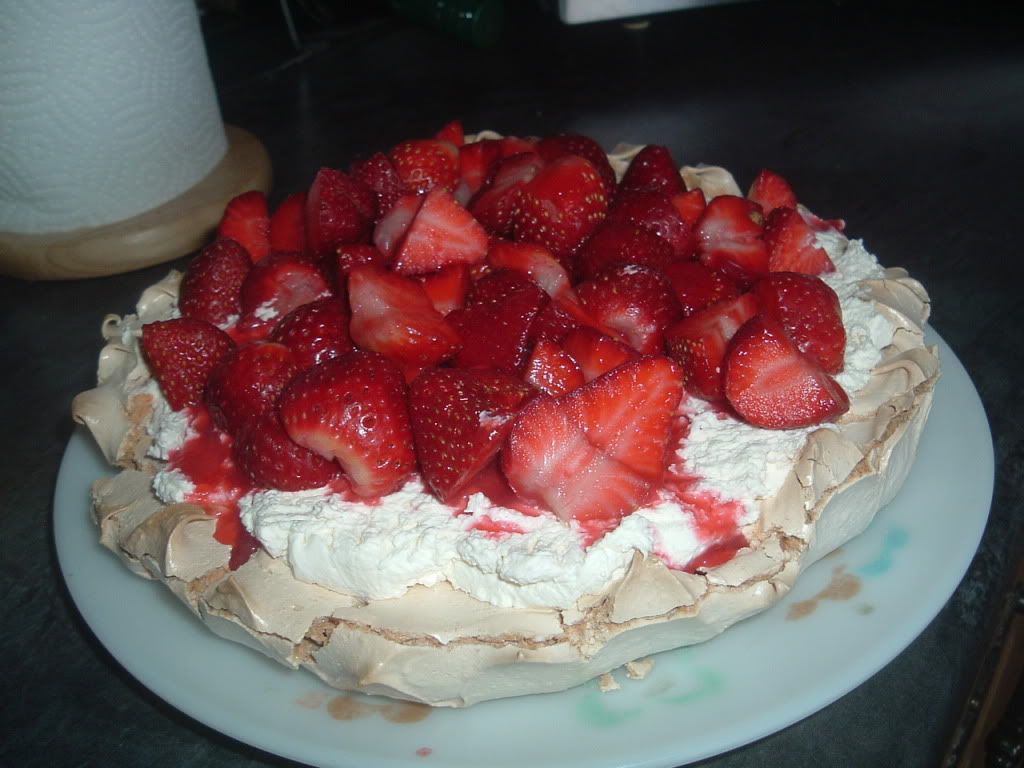
Strawberry Pavlova

I've got a quick, easy recipe for a Strawberry Pavlova that's impossible to mess up (well, not literally, but you get what I mean) and will make you look like a very accomplished baker. If you don't like strawberries than you can use any fruit you like or, if you're feeling particularly indulgent, something like profiteroles!

Ingredients
3 Egg whites (you could use the yolks for scrambled eggs in another recipe if you dislike throwing food out)
175g Sugar
150ml Double or Whipping cream
400g Strawberries

Oven Temp: 160 degrees celsius

NOTE: For ease, an electric whisk is ideal for this recipe!

Method

NOTE:
When making meringue the method is very important, if you get it wrong your meringue may come out with big sugar crystals or be one mushy mess all over your oven tray.

1) Whisk the egg whites until frothy, then (while still whisking) add the sugar slowly. You'll see the mixture become pure white.

2) Continue whisking until the mixture forms stiff, white peaks (i.e. peaks that stay up by themselves) when you take the whisk out (turn it off first!)

3) On a piece of greasproof paper, draw around a cake tin with a pen or pencil and then turn the paper over. You'll use this outline for the boundary of the meringue and you flip the paper over so that the meringue doesn't absorb any of the colour from the pen or pencil.

4) Using a butter knife, palette knife, spoon, spatula, whatever you please, form or mould the merginue however you please. If you've whisked it right, it should be very agreeable to moulding to the point where you can make a bowl.

5) Bake for around 40 minutes, but when the time is up don't take the meringue out of the oven. Turn the oven off and open the door just a crack. The meringue is very delicate and a sudden temperature change can cause cracks.

6) Once the meringue is cool, whisk your cream in a bowl until it is thick and whipped.

7) Cut your strawberries up in chunks or slices, however you prefer.

8) Spoon the cream onto the meringue and place the strawberries on top. Your pavlova is ready to serve.

This recipe is very satisfying to eat and is extremely customisable to your likes. Any fruit you like can be used, you can layer the cream/fruit however you wish and the meringue can be moulded however you like as well.
When I made this recipe a second time I shaped my meringue into a bowl with high sides and had 3 layers of strawberries and cream through it.
So don't feel you have to rigidly stick to the presentation I've descriped above!